XP and Your CD Recorder
If you want an easy (no huge learning curve) way to back up your personal files, you don’t have to look any further than your CD recorder and XP. You don’t need to upgrade to anything fancy at all. All the basic functions are covered quite nicely, right from within Windows XP. Makes you wonder what all the hoopla is with all these supposedly (but expensive) CD burning tools you can purchase, huh?
About your blank CDs ... There are two different kinds of recordable CDs you can purchase and use. The first is a plain old CD R. These CDs are the cheapest to purchase (about twenty cents), will hold about 650 (some hold more) Mb of stuff, and once that amount has been used, they are finished. You can’t use them any more. These are all right for sharing large files with friends and storing large numbers of files you may want to be able to use on other computers that may not have a CD recorder. You can’t erase the disk and free up the space to use again. Once it is used, even erased, that space is gone.
For personal backing up and other personal uses on the same computer, or other computers with a CD recorder, you might want to consider purchasing and using CD RW disks. These are a little more expensive (about 50 cents per CD), but they can be used over and over again. It is almost like adding a 650 Mb floppy disk to your computer with each disk and the price pretty much renders those $10 (100-250 Mb) zip disks and drives obsolete. Heck, these are practically disposable!
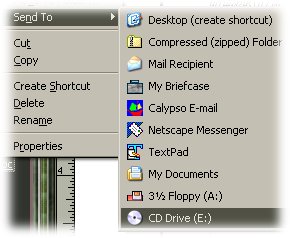 How to make it happen ... Place a recordable CD into your CD drive. You should see a window automatically appear asking what you want to do with it. Choose Open a writable CD using Windows Explorer. You might also want to put a check mark in the area where it says Always do the selected action. This way you won’t need to be bothered with this particular question any more. From then on, every time you put in a blank recordable CD, it will be ready to be used. Close the Explorer window indicating you have a writable CD. You are now ready to send any files you want to copy by simply right clicking on them and choosing Send To, and your CD drive. How to make it happen ... Place a recordable CD into your CD drive. You should see a window automatically appear asking what you want to do with it. Choose Open a writable CD using Windows Explorer. You might also want to put a check mark in the area where it says Always do the selected action. This way you won’t need to be bothered with this particular question any more. From then on, every time you put in a blank recordable CD, it will be ready to be used. Close the Explorer window indicating you have a writable CD. You are now ready to send any files you want to copy by simply right clicking on them and choosing Send To, and your CD drive.
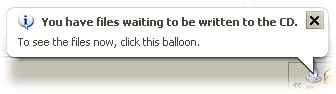 Every time you right click and “send” a file or folder to your recordable CD, you will see a little balloon message pop up at the bottom right of your main computer screen (your system tray). This is just to let you know what you just did. Click anywhere on the balloon (at any time) to see the files that will be “burned” to the CD when you are finally ready. Each file and folder will have a little down pointing arrow on it, indicating that it is marked to be copied to your recordable CD. This is where you can right click and choose Delete if you change your mind about copying any of these files to your CD. Nothing is etched in stone yet. Look down to the left in this window to see the details area. This is where you can tell how much space is available on the CD. If you highlight all the files in the right windowpane, you can look in this same Details area to see how much space they will occupy. This is a good way to reassure yourself that you have plenty of room on that pesky CD. After you have taken a peek, just X out of that window and continue using your computer normally. Every time you right click and “send” a file or folder to your recordable CD, you will see a little balloon message pop up at the bottom right of your main computer screen (your system tray). This is just to let you know what you just did. Click anywhere on the balloon (at any time) to see the files that will be “burned” to the CD when you are finally ready. Each file and folder will have a little down pointing arrow on it, indicating that it is marked to be copied to your recordable CD. This is where you can right click and choose Delete if you change your mind about copying any of these files to your CD. Nothing is etched in stone yet. Look down to the left in this window to see the details area. This is where you can tell how much space is available on the CD. If you highlight all the files in the right windowpane, you can look in this same Details area to see how much space they will occupy. This is a good way to reassure yourself that you have plenty of room on that pesky CD. After you have taken a peek, just X out of that window and continue using your computer normally.
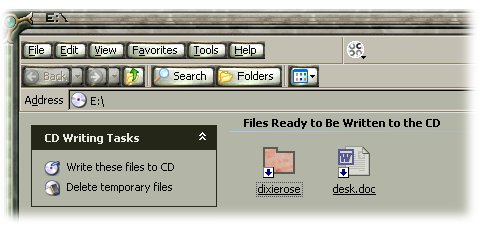 When you are finally ready, click where it says Write these files to CD. A CD Writing Wizard dialog box will appear. In the CD name box, either type in a name, or leave the default (current date). Click the Next button and sit back and relax. When it is finished, click the finish button. Your CD will pop out and you will be good to go! You can always add files later by simply putting the CD back in and right clicking on the files you want to copy to the CD. You might not see the CD Wizard until you attempt to eject the CD. No problem. Just stick the CD back in and click the Next button. That will cause your new files to be copied. When you are finally ready, click where it says Write these files to CD. A CD Writing Wizard dialog box will appear. In the CD name box, either type in a name, or leave the default (current date). Click the Next button and sit back and relax. When it is finished, click the finish button. Your CD will pop out and you will be good to go! You can always add files later by simply putting the CD back in and right clicking on the files you want to copy to the CD. You might not see the CD Wizard until you attempt to eject the CD. No problem. Just stick the CD back in and click the Next button. That will cause your new files to be copied.
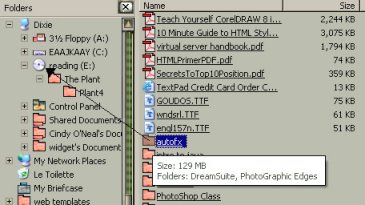 Using Recordable CDs ... Once you have a CD R or CD RW inserted, you can pretty much use it like a big floppy. It’s like having a huge floppy disk drive at your beck and call. Instead of 1.44 Mb though, you have a whopping 650 (or more) Mb of space to use for your precious personal files. You know... The ones that can’t be replaced. You can right click on any file and choose Send To, then choose your CD drive. If the files have the same name as something that is already on your CD, the old one will be replaced by the new one. If you are comfortable using Windows Explorer, you might prefer dragging and dropping files right onto the CD icon. Right click on My Computer and choose Explore. You will see two windowpanes. The right windowpane will show the contents of whatever you have selected from the left pane. Click the + to the left of anything in the left pane to cause any folders to drop down. Click any folder to have its contents appear in the right pane. In the right pane, click and hold what you want to copy to the CD, then drag it to the left windowpane and drop it on your CD icon. Do not let go of the left mouse button until you land on the CD icon. When you see it highlight, you will be able to tell you are on target. When you let go of the mouse button, your file or folder will be ready to copy. Continue dragging and dropping until you are finished. Using Recordable CDs ... Once you have a CD R or CD RW inserted, you can pretty much use it like a big floppy. It’s like having a huge floppy disk drive at your beck and call. Instead of 1.44 Mb though, you have a whopping 650 (or more) Mb of space to use for your precious personal files. You know... The ones that can’t be replaced. You can right click on any file and choose Send To, then choose your CD drive. If the files have the same name as something that is already on your CD, the old one will be replaced by the new one. If you are comfortable using Windows Explorer, you might prefer dragging and dropping files right onto the CD icon. Right click on My Computer and choose Explore. You will see two windowpanes. The right windowpane will show the contents of whatever you have selected from the left pane. Click the + to the left of anything in the left pane to cause any folders to drop down. Click any folder to have its contents appear in the right pane. In the right pane, click and hold what you want to copy to the CD, then drag it to the left windowpane and drop it on your CD icon. Do not let go of the left mouse button until you land on the CD icon. When you see it highlight, you will be able to tell you are on target. When you let go of the mouse button, your file or folder will be ready to copy. Continue dragging and dropping until you are finished.
You can see how much space is left on your recordable CD any time you want by right clicking on the CD drive icon (left pane) and choosing Properties. Another thing you can do with your right mouse button on the CD drive icon is to start burning the files to your CD by choosing Write Files to CD. Anything you have dragged and dropped will begin being burned onto the CD. This is actually the final step. Simply dragging and dropping does not actually copy the files to the CD. It just makes them ready to be copied. That’s why you will see a little down arrow on the file and folder names when you are viewing the contents of the CD. Once you choose Write Files to CD, the actual Burning begins. When it is finished, the CD will eject and you will have your archive, ready to use.
 Burning is the term that is used when your files are actually recorded onto the CD. If you look at a recordable CD carefully, you will notice that one side is colored. This is the “business” side of the CD. What happens when you copy a file to a CD is that a laser beam in your CD recording machine heats the colored side (actually it is dyed) enough to physically burn pits into the organic dye. When heated beyond a certain temperature, the area “burned” becomes opaque through a chemical reaction to the heat and ends up reflecting less light than areas that have not been heated by the laser. This area becomes the recorded part that can be read like a normal CD. Most newer computers CD-ROMs can read these “recorded” or “burned” CDs. Older devices can sometimes have difficulty and act as though there is no CD there. The next time you “burn a CD,” take a look at it and see the difference between the “used” part and the “unused” part of the CD. It is so neat! This will also help you establish the business end of the CD in your mind so you don’t go putting the thing in upside down! Believe me, it can happen. Burning is the term that is used when your files are actually recorded onto the CD. If you look at a recordable CD carefully, you will notice that one side is colored. This is the “business” side of the CD. What happens when you copy a file to a CD is that a laser beam in your CD recording machine heats the colored side (actually it is dyed) enough to physically burn pits into the organic dye. When heated beyond a certain temperature, the area “burned” becomes opaque through a chemical reaction to the heat and ends up reflecting less light than areas that have not been heated by the laser. This area becomes the recorded part that can be read like a normal CD. Most newer computers CD-ROMs can read these “recorded” or “burned” CDs. Older devices can sometimes have difficulty and act as though there is no CD there. The next time you “burn a CD,” take a look at it and see the difference between the “used” part and the “unused” part of the CD. It is so neat! This will also help you establish the business end of the CD in your mind so you don’t go putting the thing in upside down! Believe me, it can happen.
Some things to think about ... You have quite a lot of space on a recordable CD to play with. The CD-R type CDs are limited though. If you put 20 Mg of stuff on, that is 20 Mb you will NOT be able to use again, even if you replace files of the same name. The space is used. If you use a CD-RW type CD, you can record over it again and again, sort of like a huge floppy disk (only better). These CDs may not be able to be used on older computers (without recordable CDs), but they should be fine for personal use.
Got questions?
Search mrswizard.com and compuquicktips.com
with Google!
|