Starting From Scratch ...
Publisher 2003
The best work you will ever do can begin with a blank sheet of "paper." Clicking a ready made card and making a few changes isn't going to show off your own creativity and inspiration nearly as much. Microsoft Publisher can place the tools at your fingertips with a blank publication. The rest is up to you.
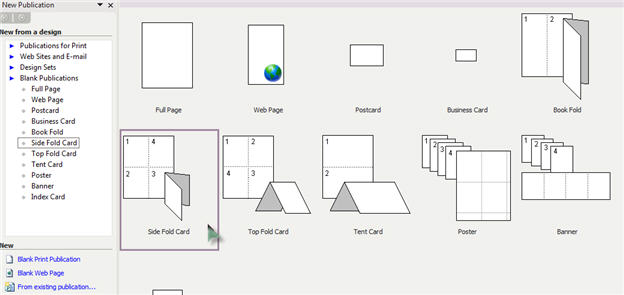
Open Publisher. Under Blank Publications, choose Side Fold Card and click on the image of a side fold card. You can see it is basically a regular sheet of paper that will be folded twice to make 4 pages.
 A little window will appear letting you know 3 additional pages will be inserted. You will only need to deal with 1 "page" at a time in your card. When it comes time to print, Publisher will take care of all that for you so when you fold it, all will be perfect. A little window will appear letting you know 3 additional pages will be inserted. You will only need to deal with 1 "page" at a time in your card. When it comes time to print, Publisher will take care of all that for you so when you fold it, all will be perfect.
Look around a bit ... At the bottom of the 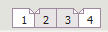 main window, you will see your page indicators. The darker one is the current page view. Left click once on any of the other page numbers and that page will appear. Notice how pages 2 an d3 seem to be together? That is because they are the inside pages of your card. Page 1 is the outside cover. Page 4 is the back. The blue dotted lines are your margin guides. main window, you will see your page indicators. The darker one is the current page view. Left click once on any of the other page numbers and that page will appear. Notice how pages 2 an d3 seem to be together? That is because they are the inside pages of your card. Page 1 is the outside cover. Page 4 is the back. The blue dotted lines are your margin guides.
 Working with the Objects Toolbar ... At the very left of the main Publisher window, you will find the Objects Toolbar. Most of what you do will begin by clicking one of these buttons. There are two basic object types. Text boxes, where you can type text, and Picture boxes. When working with Objects, it is as simple as choosing (clicking) the one you want, then drawing it on your page. Then it is up to you to fill it with what you want. Here is a brief rundown on the top 6 object tools and how to use them. Working with the Objects Toolbar ... At the very left of the main Publisher window, you will find the Objects Toolbar. Most of what you do will begin by clicking one of these buttons. There are two basic object types. Text boxes, where you can type text, and Picture boxes. When working with Objects, it is as simple as choosing (clicking) the one you want, then drawing it on your page. Then it is up to you to fill it with what you want. Here is a brief rundown on the top 6 object tools and how to use them.
The Pointer Tool is the easy to spot arrow at the top. Click this tool every time you need to select an object. Then left click once on the object you want to select and you will see the selection handles appear.
Text Frame Tool ... Click the box with the A in it to select this tool. Move the mouse pointer to your page. You should see the pointer change to a cross. While holding down the left mouse button (and starting at the top left), drag to the right and down until the area you want to place your text is outlined. Let go of the mouse button and your text box is ready for you to type in. Don't worry if it isn't big enough, or if it is too small. You can always make it larger or smaller by positioning the mouse pointer on any of the little black handles until you see the resize indicator. Then drag the box in or out to resize.
You should see a blinking cursor in your text box when it is first created. If you need to get a little closer, press the F9 key at the top of your keyboard. That will quickly toggle you between a full page view or up close and personal. It will quickly become one of your favorite keys when using Publisher.
When you have a Text Frame open, you should see an additional set of buttons at the top of the Publisher window. These are Formatting Tools to use for your text. Choose the font you want, the size, and color. If you let your mouse pointer linger over each button, a description will appear, letting you know what it will do. Click each one to select. Working in a Text Frame (text box) is very similar to using a word processor.
There are quite a few extra perks in Publisher's text boxes. This is not your average word processing program. Look at the top toolbar and click the Fill Color Tool. Choose None to make the background of the text frame clear. This is great when you need to place text over an image and you want the text to appear to be part of the graphic.
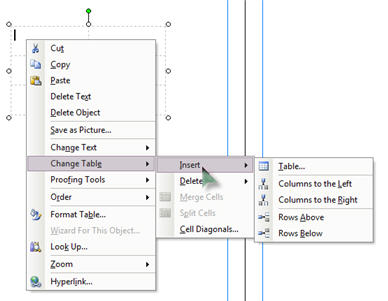 Table Frame Tool is the perfect way to put rows and columns into your publication. This makes lining up lists much easier than trying to use the tab key and when you print, the columns will be perfect. Click it once, then move the mouse pointer to outline the area you want your table to fill. Let go of the mouse button and a new window will appear with different options for your table. Fill in the number of rows and columns you want to start with and which formatting you want (you can scroll and click to see a small preview of what it might look like). None will give you a table with the lines outlined but not printing. When finished, click OK. Table Frame Tool is the perfect way to put rows and columns into your publication. This makes lining up lists much easier than trying to use the tab key and when you print, the columns will be perfect. Click it once, then move the mouse pointer to outline the area you want your table to fill. Let go of the mouse button and a new window will appear with different options for your table. Fill in the number of rows and columns you want to start with and which formatting you want (you can scroll and click to see a small preview of what it might look like). None will give you a table with the lines outlined but not printing. When finished, click OK.
Once you have your table created, treat it just like any other table. Right click on it and move the mouse pointer down to where it says Change Table to see additional options. You can choose whether or not to have the lines show.
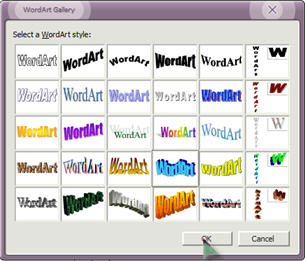 WordArt Frame Tool ... This is a great way to creat fancy text headlines. Click it once to select, and choose the fancy effect you want. Click OK and a new box will appear. The words Your Text Here will already be highlighted. There is no need to delete before typing. Just begin typing. Once you do, the existing (highlighted) words will be replaced with what you type. When you are finished, click OK again. WordArt Frame Tool ... This is a great way to creat fancy text headlines. Click it once to select, and choose the fancy effect you want. Click OK and a new box will appear. The words Your Text Here will already be highlighted. There is no need to delete before typing. Just begin typing. Once you do, the existing (highlighted) words will be replaced with what you type. When you are finished, click OK again.

Your text will appear as a special object. When it is selected, you should see a new set of tools appear at the top of the main window. These are special tools, because a WordArt object has special powers. 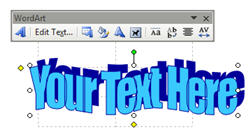 It is sort of a cross between a graphic and text, because you can choose any fonts available on your computer, and graphic, because you can do things to it that normally would be done to an image. Click each one of the tools to experiment with different colors and shapes. Let your imagination take you away! It is sort of a cross between a graphic and text, because you can choose any fonts available on your computer, and graphic, because you can do things to it that normally would be done to an image. Click each one of the tools to experiment with different colors and shapes. Let your imagination take you away!
Because special effects are so dramatic, be sure to use this tool sparingly. You wouldn't want to detract from your main message.
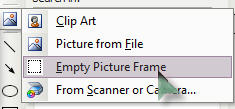 Picture Frame and Clip Gallery Tools ... The Picture Frame tool has changed a bit in Publsher 2003. The moment you click it, you will see choices. If you choose Clip Art, your Clip Art Gallery tool will appear with a nifty little search box. Just follow the yellow brick road and if you are connected to the Internet, there should be all kinds of choices for you. If you choose Picture from File, you need to be able to navigate to where the image file you want to use is, so you can select it. I kind of like the Empty Picture Frame tool. It will allow you to "draw" an empty frame you can double click in and navigate to and select any image to put into it. Once your graphics are in place, no matter which you choose, making changes is as easy as double clicking in the frame. Picture Frame and Clip Gallery Tools ... The Picture Frame tool has changed a bit in Publsher 2003. The moment you click it, you will see choices. If you choose Clip Art, your Clip Art Gallery tool will appear with a nifty little search box. Just follow the yellow brick road and if you are connected to the Internet, there should be all kinds of choices for you. If you choose Picture from File, you need to be able to navigate to where the image file you want to use is, so you can select it. I kind of like the Empty Picture Frame tool. It will allow you to "draw" an empty frame you can double click in and navigate to and select any image to put into it. Once your graphics are in place, no matter which you choose, making changes is as easy as double clicking in the frame.
 Custom Text Wrapping in MS Publisher ... Custom Text Wrapping in MS Publisher ...
When you need to make text and graphics relate to each other in a very special way, most word processors simply don't have the tools Publisher does.
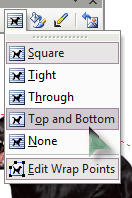
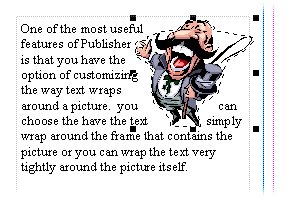 Place your picture right on top of your text box, placing it about where you want. You can always move it around later. Click the word Arrange at the top of the main window and choose Bring to front to make toure the graphic is on top. With the picture selected, click the button labeled Wrap Text to Picture. This will cause the text to wrap closely around the picture, rather than the entire picture frame. If you need even more control, click Edit wrap points and you will see more handles appear (nodes) that you can pull in our out, up or down and really customize the way the text will wrap around that picture. You can even add nodes for more precise wrapping. Place your picture right on top of your text box, placing it about where you want. You can always move it around later. Click the word Arrange at the top of the main window and choose Bring to front to make toure the graphic is on top. With the picture selected, click the button labeled Wrap Text to Picture. This will cause the text to wrap closely around the picture, rather than the entire picture frame. If you need even more control, click Edit wrap points and you will see more handles appear (nodes) that you can pull in our out, up or down and really customize the way the text will wrap around that picture. You can even add nodes for more precise wrapping.
Got questions?
Search mrswizard.com and compuquicktips.com
with Google!
|