Using Layers
Layers make many things easier when you are working with images. Think of each layer as a separate graphic that can be moved, tweaked, faded, blended, written on and manipulated any way you can imagine. If you don't like the way any layer is going, delete it and begin a new one. Put several layers together and you can have a masterpiece!
In order to use your layers each time you open your Paint Shop Pro image, make sure you save the main file in the native Paint Shop Pro format. It will have a .pspimage extension at the end of the file name. When you open a .pspimage file, any layers you have added to that particular file will be available to use or change. Always keep the original file as a .pspimage file.
When you want to share your work, click the word File, then Save Copy As and save a quick copy of your file as a .jpg file (anyone can open, even without Paint Shop Pro). Put the jpg copy anywhere you want. This is the file you can use to send your artwork to your email buddies. Once the file is caved as a .jpg file, it can be opened again with Paint Shop Pro, but all the layers will have been merged and cannot be changed. YOU have the big Kahuna... the main .pspimage file in all its radiant glory, with all its layers and other special tweaking capabilities intact. This is your working file. |

This is the graphic created while working with this tutorial. Click it once to view the full size. When you have it open in a new window, right click the image to save it as your background wallpaper if you wish.
|
 Begin with a photo ... Begin with a photo ...
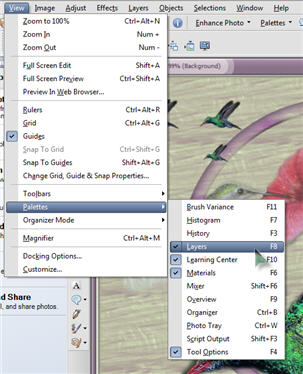
A 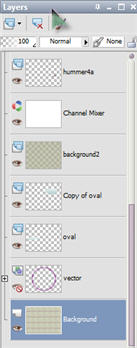 simple way to begin learning about layers is to open a photo, probably a .jpg file in Paint Shop Pro. Make sure you can see your layer palette by clicking the word View at the top of the main Paint Shop Pro window, then Palettes, and Layers. Your Layers Palette will appear on the right of your main window, with a scroll bar to the right of it as the number of layers grow in your image. simple way to begin learning about layers is to open a photo, probably a .jpg file in Paint Shop Pro. Make sure you can see your layer palette by clicking the word View at the top of the main Paint Shop Pro window, then Palettes, and Layers. Your Layers Palette will appear on the right of your main window, with a scroll bar to the right of it as the number of layers grow in your image.
Hold your mouse over the buttons at the top of the Layers Palette and little popup messages will appear letting you know what each button is for. The button to the left has a little down arrow on it. This means clicking it will show more options for that button.
There are two ways to create a new layer. Click the button to the left and choose New Raster Layer (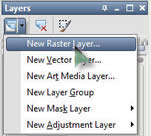 you can read more about the others in the PSP help area). This will create a new blank layer just above the current layer. If you are looking at a photo. The photo image is the background layer. you can read more about the others in the PSP help area). This will create a new blank layer just above the current layer. If you are looking at a photo. The photo image is the background layer.
Another way to create a layer (very useful) is to right click any existing layer and choose Duplicate. This does just what the name implies... the existing layer is duplicated. You can rename any layer by clicking the name of the layer so the text is highlighted. Type in your new name and click anywhere else to lock in your change.
Layers keep you organized. Naming them can be very important when you need to find a part of a very intricate graphic. Learn to organize the same time you learn to use layers. Duplicating a layer is a great way to try interesting effects and test brushes. If you like the way things are going, keep it up. If you find yourself digging a hole, delete the "bad" layer, make a new copy and begin again. You can also use layers to show different effects, turning them "on" or "off" by simply turning the layer on or off. Layers are on (visible) by default. Turn any layer off by clicking the little eye to the left of the layer thumbnail in the layers palette.
 Adding Text Adding Text
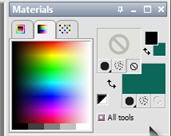
Open  any .jpg image in Paint Shop Pro. Create a new vector layer and name it text. Click the Text tool in the toolbar (it is a button with an A on it), and click once in your blank image. You will see the text dialog box appear, with a new set of tools at the top of the window just for that tool. Choose Vector in the Create as box. In the Materials area (just above the layers palette, choose none for the foreground/stroke color and any other color for your background/fill color. Type your text in the Text Entry box and click the Apply button. Your text will appear with handle around it. Move your mouse around until you see crosshairs. This will indicate you can left click and hold and move your text object around. Placing the mouse on the corners will allow you to resize the object. any .jpg image in Paint Shop Pro. Create a new vector layer and name it text. Click the Text tool in the toolbar (it is a button with an A on it), and click once in your blank image. You will see the text dialog box appear, with a new set of tools at the top of the window just for that tool. Choose Vector in the Create as box. In the Materials area (just above the layers palette, choose none for the foreground/stroke color and any other color for your background/fill color. Type your text in the Text Entry box and click the Apply button. Your text will appear with handle around it. Move your mouse around until you see crosshairs. This will indicate you can left click and hold and move your text object around. Placing the mouse on the corners will allow you to resize the object.
Got questions?
Search mrswizard.com and compuquicktips.com
with Google!
|