 Some of the world's greatest feats were accomplished by people not smart enough to know they were impossible.
|
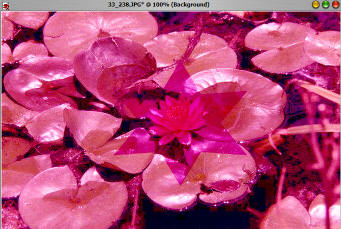
HistogramsDon't let the term intimidate you. A histogram is just another way to tweak photos with your favorite photo editor. You can jump in and start tweaking and fiddling with the knobs and sliders and end up with pretty good results, but if you understand a little about what it does and why, your results will be a lot better. What a Histogram does ... A Histogram doesn't really do anything. It is simply a graph. It allows you to see what happens when you correct colors and sharpness in photos using levels. A Histogram tool can be very detailed with sliders for the primary colors (red, green and blue) as well as brightness and contrast. It is a pretty safe tool to use. Nothing is etched in stone until you lock in your changes. I received an email from Dave Barrett (a fellow I met on the Sun Princess in February, 2005) describing information he had gleaned from a sales rep at his local camera store. The sales rep said to look at the Histograms for each image and adjust the black and white sliders. He also said to do this for each of the three primary colors. This will get you 80% of any corrections required. The sales rep went on to say he was taught this technique at the Nikon image processing school. Well heck! If it is good enough for a camera pro, it must be important! Dave used Photoshop Elements to process the images from his cruise. Thanks Dave! You sure made me pay more attention to Histograms, and I appreciate your sharing! I'm not going to try to go into many technical details here, or push one photo editing program over another (I like them all). Certainly Photoshop Elements and PaintShop Pro aren't the only photo editing programs that use histograms, but they are very popular and inexpensive. The Histogram may look a little different in your favorite image editor, but the functions are the same. I only want to help you get started, and perhaps remove the intimidation factor, by sharing my personal musings and experiments with the Histogram. The tweaking, tuning and fiddling is up to YOU! Adobe Photoshop and Dragging the Input and Output sliders changes all the pixels in the image. Make sure there is a check in the Preview box so you can see your changes on the image as you do them. Set the highlights Want to see a perfect negative of your photo? Swap the Output Levels sliders! Experiment with Channels ... Click the little set of arrows to the right in the Channel box to choose any of the primary color channels to tweak. If you are looking for special effects, or just need a tiny color correction on an image, this is a great place to experiment. Use the same Input and Output Levels, but for one color channel at a time. For example, if you choose the Red channel and adjust the middle Input slider to the left, the red in the image will be enhanced. Use the Blue channel and adjust the middle input slider to the left to bring out the blue in the image. Moving the left Output Levels slider to the right can cause even more striking changes to your image. Paint Shop Pro XI ... To open the Histogram tool, move your mouse pointer to the top of the main Paint Shop Pro window, click the word Adjust, then Brightness and Contrast and Histogram Adjustment (CTRL+Shift+H). To make sure you begin with a clean slate, click the little down arrow next to Presets and choose Default. The Histogram tool looks a little more elaborate in Paint Shop Pro, with an extra set of Before and After preview panes at the top of the dialog box. Click the little eye to the left (under the right preview image) to have a continuous live preview on your main image. You'll have previews out the wazoo! Tweaking and Fine Tuning ... If the image is too dark or too light, adjust the gamma. If it is too dark, drag the Gamma slider to the right to increase the gamma (make it lighter). If the image is too light, drag the Gamma slider to the left to decrease the gamma (make it darker). If you have a photo where the flash fouled a bit, leaving you with the subject bright and the background too dark, the midtones need to be compressed. Click and drag the Midtones slider up for this adjustment. Like the Histogram tool in Photoshop, moving the Low and High adjustments will cause the Gamma to move too. The Gamma can be moved separately, but the high and low can not. Don't ask me why. I don't have a clue. Just making an observation. Selection special effects ...While fiddling around with PaintShop Pro, I discovered the selection tool could be used in conjunction with the histogram tool for some really interesting effects. Before opening the histogram, use the selection tool to select a part of the image. Once the selection tool is clicked, look at the top of the main window for a Selection type drop down box. You will see quite a few shapes to choose from. Draw your selection on the image. With the outline showing, press CTRL+Shift+H to bring up the histogram palette. Make your adjustments and click OK. Neat! It is amazing what a few flicks of the wrist can do!
Got questions?
|
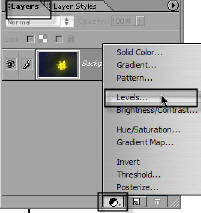 Photoshop Elements ... To open the Levels dialog box (Histogram), click the word Enhance at the top of the main screen, then Brightness/Contrast and Levels. The keyboard command is
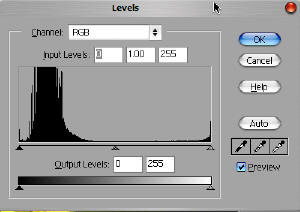 and shadows by moving Input sliders and contrast by adjusting the Output sliders. Using these levels to adjust your images gives you much more control over how you want to lighten, darken or adjust the contrast of your image. You only need to move the sliders a tiny bit to see a huge change. Set the highlights and shadows in an image by moving the Input sliders in just a bit. The middle slider will adjust proportionately so you don't accidentally alter the color balance. Use the middle Input slider (on purpose) to change the intensity.
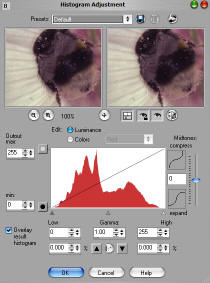 Luminance or Colors ... To correct contrast, start with the Luminance (brightness) channel. The Gamma slider will adjust the brightness and contrast together. To adjust colors, choose Colors, then the color you want to adjust from the drop down box to the right. For example, if your image has a bit too much red in it, you can choose the Red value in the Colors drop down box and reduce the red by sliding the gamma to the left. Add a little more red by sliding it to the right. Remember that first color TV your parents purchased? I used to have a ball fiddling with those knobs!