 Quick Tip ...Do a google search for psp tubes. You won't believe how many devoted "Tubers" there are!
I don't suffer from insanity. I enjoy every moment.
|
The Eraser Tools
How to use the Eraser and Background Eraser tools ... Now move your mouse pointer over to the toolbar on the left and click either the Eraser or the Background Eraser tool. Do a little experimenting with each. Move your mouse pointer over to your image and erase by holding the left mouse button down and moving it around the image. Once either tool is clicked, a Tool Options bar will appear at the top of your window. Use this to choose the size of the brush and other options. The Tolerance adjustment gives you a lot of control. Make sure Auto Tolerance is UNchecked if you want to use it. The higher the number, the more it will erase. At lower settings, only pixels with very similar colors will be erased. Auto Tolerance can be checked if you want the Background Eraser tool to determine the tolerance based on where you click (the path). It may change continuously as the tool moves over different parts of the layer. Set the Size to something you are comfortable with. If you have a large area to work with, a large brush is fine. Make it very small if you need to get really close to an edge without messing it up. Set the Opacity to 100%. This will erase to complete transparency.
Paint Shop Pro Tubes
If you are wondering why I'm just now getting to the Tubes part, it is because no matter how much fun that tool can be to use, and no matter how many neat tubes you can find just doing a google search for psp tubes, you are bound to eventually want to make your own. All the information about the eraser tools will help you do just that. Here's how to begin to create your own tubes. Prepare your image ... Use the Background Eraser on images with well defined backgrounds to quickly create your own Picture Tubes. Use the Freehand Selection or Selection tool to outline your image. Press CTRL+C to copy it to the clipboard. Press CTRL+V to paste it as a new image. Do any resizing or cleaning up you need to do. Then click the word File, Export, and choose Picture Tube. Give your new tube a name and make sure it is going where you want it to go, then click OK. Another way to do tubes is to put multiple images in one tube. When you use a multiple image tube, each click will stamp a random image from the tube. To create a multiple image tube, you will need to do a little math. Make sure you know the height and width of the images you want to use. Try to keep them close to the saem size. Small images are perfect for tubes. Use the Background Eraser and prepare each one. Copy and paste each as a new graphic. Line them up next to each other so you have easy access to them. Create a new Paint Shop Pro image the size of all your images together. Think of placing them in rows and columns. For example, 3 images 50 pixels wide and 50 pixels tall would need a new image of 150 pixels wide and 50 pixels tall. If you want to have two rows, make it 100 pixels tall.
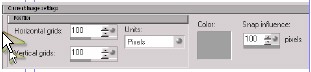
Set up your grid ... Click View, then Change Grid, Guide and Snap Properties.In the next window that appears, click the Grid tab. Don't worry about the default area at the top. Just change the grid for the image you are working on. These settings are below the default section. To see your grid, click the word View and Grid.
You can paint with your tubes on any image you have opened in Paint Shop Pro. Click the picture tube button, choose your tube and off you go!
Got questions?
|
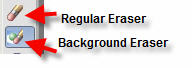 One of the neatest tools in Paint Shop Pro just keeps getting better and more refined with each new version. The old Eraser tool is still handy. It can be used to erase areas of a photo or other graphic. All the erased area becomes transparent or clear. You can take what is left and put it over any background to give your image a whole new look. The problem with it is it can be awfully time consuming, especially if you are working on a large area with lots of details. The Eraser tool erases everything. If you accidentally drag over the object you want to keep, it will be erased too. The Background Eraser tool is a wonderful time saver. Use it when you need to selectively erase areas. For example, you might want to erase just the sky from a landscape photo, or the background from a clip art image. If you use the Background Eraser, it will magically leave what you want to keep alone.
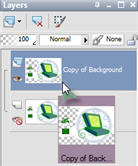 With your image opened, first create a new layer. In your layer palette, right click on your first image layer (usually named Background) and choose Duplicate. A new layer will be created for you to work with. You can turn off the first layer by clicking the little eyeball. Don't worry. It only hides that layer. You can turn it back on whenever you want. This way you will be able to see the transparency when you erase. Make sure you select your layer copy so it is highlighted.
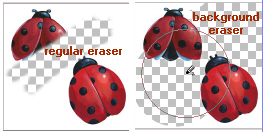 The rest of the tools? Check them out! Experimenting is half the fun. If you get this far, curiosity has set in and you won't be able to resist checking out the other settings. Click the word Help at the top of the main Paint Shop Pro window. You will find a lot of information about your eraser tools.
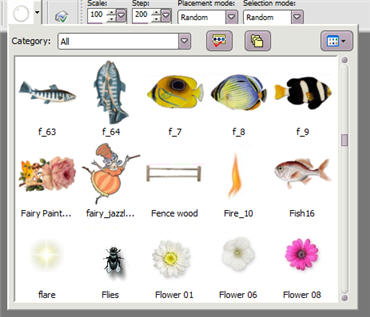
 Once you have your grid set up, it is a matter of copying and pasting your individual images into each section of your new image. Once you are finished, click the word File, then Export, and Picture Tube. You will need to fill in the number of cells across and down. Give your tube a name and click OK.