Windows Paint
It's time to saddle up "Old Paint" and do some serious doodling. I am referring to your Paint program that comes packed in the Windows Accerrories group of folder. It is easy to use, versatile, and quite accessible.
The first thing you might notice when you open Paint is the nice white area in the window, a blank canvas waiting for you to express yourself. To the left of this "clean slate" is the toolbar, pairs of buttons lined neatly down the side of the window. Hold the mouse over each button for a second and watch it identify itself. Information will also appear at the bottom of the window if you click the word View and make sure Status Bar has a check mark beside it. Clicking on a button makes it active. You can only use one tool at a time.
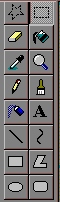 The first pair are the Free Form Select and the Select tools. These allow you to select certain parts of your picture and move them to other places. Use these tools to cut or copy a section, and put it on your clipboard for use in another application. The one shaped like a dotted star will allow you to take your mouse and, while holding down the left button, outline anything in an open picture. The other will let you select a square section at a time. Once the area is selected (it will have an outline around it), placing your mouse in the center of that area will cause the pointer to change to a 4-pointed arrow. When it does, hold down your left mouse button, and you can literally lift that entire area out of the picture and move it somewhere else. When it is placed where you want, click outside of the outline area to lock it in. Note...once you have it locked in, you won't be able to click on it and have the outline reappear (to move it somewhere else). You would need to start all over. Fortunately, clicking on the word Edit and Undo will let you undo quite a few "boo boos". The first pair are the Free Form Select and the Select tools. These allow you to select certain parts of your picture and move them to other places. Use these tools to cut or copy a section, and put it on your clipboard for use in another application. The one shaped like a dotted star will allow you to take your mouse and, while holding down the left button, outline anything in an open picture. The other will let you select a square section at a time. Once the area is selected (it will have an outline around it), placing your mouse in the center of that area will cause the pointer to change to a 4-pointed arrow. When it does, hold down your left mouse button, and you can literally lift that entire area out of the picture and move it somewhere else. When it is placed where you want, click outside of the outline area to lock it in. Note...once you have it locked in, you won't be able to click on it and have the outline reappear (to move it somewhere else). You would need to start all over. Fortunately, clicking on the word Edit and Undo will let you undo quite a few "boo boos".
The next pair down are the Eraser/Color Eraser and the Fill With Color tools. These work hand in hand with the color pallet available at the bottom of your screen. If you click your right mouse on a color, you will see one of the squares to the left of the pallet change to that color. This also applies to the left mouse button. When you click your left or right mouse button on your work area, depending on which tool is active, the button will produce that color. You choose the colors with your mouse buttons and the tools do something specific with those colors.
When you click the Eraser tool, you will see an extra section of settings to use with it in the same area as your color choices. Clicking on one of these lets you choose how big an area you want to erase at one time. Once your choice is made (with the left mouse button), just "draw" on the area you want to erase. Drawing is done with one of your mouse buttons held down. The color depends on what your choices are for each mouse button.
The Fill With Color tool looks like a paint can tilted over a bit. When it is the chosen tool, you can click on any area in your artistic creation and the color of that area will be replaced with a new color. After your first few misses, you will discover that if you don't have the little dribble well inside the area you want to recolor, you could get
unexpected results!
 The little eye-dropper is a Pick Color tool. Once you click on it, you can tap with it on any color in your drawing and that will be the new color for your left mouse button. After the new color is chosen, you will immediately be taken back to the last tool (or brush) you were using. Use it to expand your color choices. The little eye-dropper is a Pick Color tool. Once you click on it, you can tap with it on any color in your drawing and that will be the new color for your left mouse button. After the new color is chosen, you will immediately be taken back to the last tool (or brush) you were using. Use it to expand your color choices.
The Magnifier tool looks like a magnifying glass and does just that. Click on it once, then click on the spot in your drawing that you would like to see enlarged. There are additional zooming choices at the bottom of your screen when this tool is selected. Click the Magnifier, then click the zoom choice, or just click on the section you want ZOOMED!
Just below the Pick Color tool (eyedropper) is the Pencil, aptly named because of the way it looks. Clicking once on this will allow you to sketch in a freeform manner on your picture. the Color Box at the bottom of the screen gives the option of selecting a different color for the right and left mouse buttons. Drawing with the left mouse button held down will produce one colored line, and holding the right mouse button will produce another color. This tool remind me of an Etch-A-Sketch I had when I was a kid...little control, but lots of fun!
 Color Box ... Color Box ...
The Color Box lets you know the current foreground and background colors. To paint with the foreground color, click the color you want with the left mouse button and drag the pointer with your left mouse button held down. To paint with the background color, click the color you want with the right mouse button and drag the pointer with your right mouse button held down. To select a color, use the right mouse button for the background color and the left mouse button for the foreground color. It really is that simple!
Next, to the right, is the Brush. Once selected, another set of choices are available below the toolbar. You may have to click on the word View at the top of your menu bar and uncheck your Color Box so you can see them better. Experiment by clicking on each of these choices and watch the brush strokes change. The Brush is also able to give you right and left mouse color choices.
My favorite is the Airbrush. It looks like a spray paint can. Extra "splatter" choices should appear at the bottom of the screen when this tool is chosen. If you really want to vent some serious frustrations, try opening the Mona Lisa and test your graffiti skills. Your mother-in-law may also need a few "touch ups". Just don't let your spouse catch you at it. They might not appreciate the mustache on the old gal as much as you do.
The Text tool is the button with the capital A on it. When this tool is clicked and the mouse is brought to the drawing area, you should see something that looks a little like crosshairs. Text has its own special toolbar that you need to bring up at this time. Click the word View and make sure Text Toolbar has a check beside it. This is where you get to choose the font and size of the type you are going to be using. Once you decide on a font, choose the color you want to use with the left mouse button. Now, click on the drawing area and get ready to type your message. The neat thing about the text tool is that what you type automatically stays on top of the picture. If you have a favorite clip art image you would like to add a little personal message to, this is the way it would be done. I must mention that when adding text to a photo or clipart image, you will only have one chance to place it. It needs to be right the first time, because once you click somewhere else on the drawing, you will be beginning another "text box". The more elaborate drawing and paint programs give a lot more flexibility with text than this basic application does. It can still get the job done though, and everything you learn while working with this program , will prepare you for other painting and art programs you may wish to use in the future.
Guess what you will be doing when the Line tool (just below the airbrush) is selected? To choose the width the line will be, click a line width from the bottom of the tool box. To choose the color the line will be, click a color. To draw the line, drag the mouse from the beginning of the line to where you want the line to end. When you let go of the mouse button and reposition it on the drawing, you will begin another line. Use the left mouse button to draw with the foreground color, or the right mouse button to draw with the background color. To draw a perfectly horizontal, vertical, or 45-degree diagonal line, press and hold down SHIFT while dragging the mouse pointer.
The Curve tool is next to the Line tool, and it helps to create curves. Once the line is drawn, you can "pull" it to form shapes and curves. Different line widths are available at the bottom of the toolbar, and left and right mouse color options are available. Experiment with different colored lines and curves on a new drawing. Use the Fill with Color tool to fill in some of the areas. You might end up with "Wallpaper" material. That's when you give your new picture file a name with a .bmp extension, and store it in your Windows directory. When you right-click on your desktop (Windows 95) and choose Properties, your file will become one of your wallpaper choices.
The last four tool/toys are the Rectangle, Polygon, Ellipse, and Rounded Rectangle. These give you the shapes you need by simply clicking on the one you want, and dragging your left mouse button over the area you want to cover. If you hold down your SHIFT button while you are dragging, you can have a perfect circle, square, or rounded square. Holding down the SHIFT key while drawing applies to a lot of high powered programs. Does that mean it's some sort of common command? Hmmmmm...I smell a consistency fish!
Most of the commands discussed in this article also apply to other drawing and paint programs. Everything you learn fiddling around with MS Paint will increase your skills and can certainly be applied to other Windows programs. You might also fool around and have a little fun!
Got questions?
Search mrswizard.com and compuquicktips.com
with Google!
|