Desktop Publishing with Word
I did a training session for a lady who was making a transition from MS Works to Word. The more I listened, the more I realized she really needed more of a Desktop Publishing program like Microsoft Publisher. She was needing more precise placement and control over graphics than I though Word was capable of. After a little poking around, I was surprised to learn there was more to Word than simple letters and templates. You really can control your images and end up with very Desktop Publishing results!
Open Ms Word and put several paragraphs of text on the first page. Lipsum.com is a great place to find Lorem Ipsum text. All you need is random text for this tutorial. We will be focusing more on image placement and manipulation.
 Find and place an image. Find and place an image.
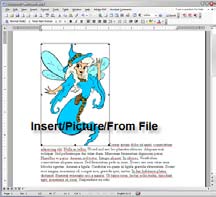
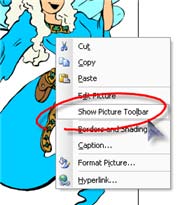 Any image will do. Something relatively small is preferable. Make sure your blinking cursor is at the beginning of the text. Click the word Insert at the top of the main window, then Picture, then From File. Choose the image you want to use, then click the Insert button. It isn't going to be pretty yet and you really won't be able to freely move it around. Right click anywhere on your image and choose Show Picture Toolbar. This is the toolbar you will need when you want to tweak any images. Any image will do. Something relatively small is preferable. Make sure your blinking cursor is at the beginning of the text. Click the word Insert at the top of the main window, then Picture, then From File. Choose the image you want to use, then click the Insert button. It isn't going to be pretty yet and you really won't be able to freely move it around. Right click anywhere on your image and choose Show Picture Toolbar. This is the toolbar you will need when you want to tweak any images.
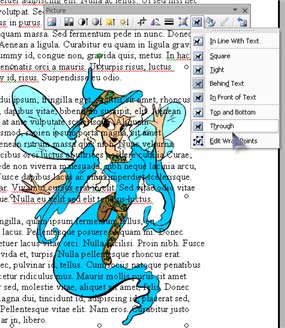 With the image still selected, click the Text Wrapping button on the Picture Toolbar. You will see a drop down menu with all kinds of choices. Each choice is pretty self explanatory with a picture of how the text will look around the image. Any wrapping option other than InLine with Text will allow cross hairs when you have your mouse pointer in the middle of the image. This means you can drag by holding the left mouse button down and position the image anywhere on the page you want. The text will flow around the image different ways, depending on the text wrapping choice you make. With the image still selected, click the Text Wrapping button on the Picture Toolbar. You will see a drop down menu with all kinds of choices. Each choice is pretty self explanatory with a picture of how the text will look around the image. Any wrapping option other than InLine with Text will allow cross hairs when you have your mouse pointer in the middle of the image. This means you can drag by holding the left mouse button down and position the image anywhere on the page you want. The text will flow around the image different ways, depending on the text wrapping choice you make.
watermark
To achieve a nice washed out effect, suitable for a watermark, double click the image to bring up the Format Picture dialog box. 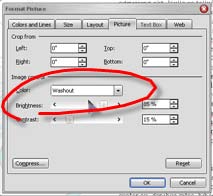 Click the Picture tab and choose Washout. You can adjust the percentage of the effect you want with little sliders. Click OK to return to your document and view your handiwork. Click the Picture tab and choose Washout. You can adjust the percentage of the effect you want with little sliders. Click OK to return to your document and view your handiwork.
Use the Behind Text option in the text wrapping area to have your image appear behind the text on the page. This can give a nice watermark effect without having to jump through the hoops of actually adding a watermark image in Word. Be sure to make any adjustments to your image before you choose this option, because once it is behind the text, it will be difficult to get to. You can move it with your arrow keys on the keyboard if you can't see the crosshairs.
 wrapping text wrapping text
Square wraps text around all sides of the image in a rectangular fashion. Actually when you think of it, all images are really rectangle shaped.
Tight wraps text tightly around the edges of the actual images, if it can find the edges. This doesn't work automatically with all images. If you use .wmf images, it will find edges because .wmf images are vector graphics. .jpg images (like photos) are pretty much rectangular as far as Word is concerned.
In Front of Text, means just what it says; in front of the text. It isn't a very practical choice if you want to read all the text.
Top and Bottom wraps text around the top and bottom of the selected object and excludes the text from the sides. Text stops at the end of above the object and continues below the object.
Through will behave very much like Tight, except it will cause the text to wrap inside any parts of the object that are open.
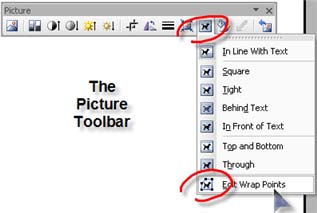
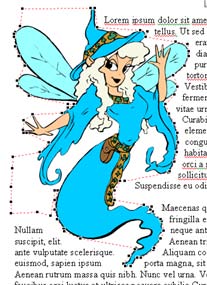 Edit Wrap Points is a goodie if you want to really customize the way your text wraps around the image. It will cause a bunch of little squares (wrapping points) around your image. You can add wrap points by left clicking on the line between existing wrap points. Drag the points to shape the area you want to wrap the text around. Your text will wrap to these points when using Tight or Through. Edit Wrap Points is a goodie if you want to really customize the way your text wraps around the image. It will cause a bunch of little squares (wrapping points) around your image. You can add wrap points by left clicking on the line between existing wrap points. Drag the points to shape the area you want to wrap the text around. Your text will wrap to these points when using Tight or Through.
other uses for the Picture Toolbar
 The Picture Toolbar has quite a few shortcuts to often needed adjustments. Remember though, the Picture Toolbar will only work when you have an image selected (clicked). You can always tell your image is selected by the handles (little black boxes) around the image. The Picture Toolbar has quite a few shortcuts to often needed adjustments. Remember though, the Picture Toolbar will only work when you have an image selected (clicked). You can always tell your image is selected by the handles (little black boxes) around the image.
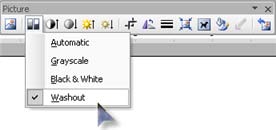
Let your mouse linger over each button to see what it will do. The Color button (second from left) gives you a quick Washout option if you want to make your image a background watermark. It sure saves a lot of mouse clicks and having to remember what to choose when you right click an image. With the Picture Toolbar you can quickly adjust things like brightness and contrast. If you totally screw up, you can hit the reset picture button on the far right. Of course, this is only a last resort, because you will be forced to start over with your image. If you really don't like something you have done with your image, remember the old faithful keyboard command, CTRL+Z. Word offers unlimited Undos, so you can use CTRL+Z to go back one step at a time until you are exactly where you want to be with your image, or anything else in Word.
A quick flip
If your image is facing the wrong way, you can use the side handles to Flip it. Grab the left handle and drag it to the other side of the image, making sure you go the full width of the image. This will cause the image to appear to face the other direction. This is not exact, and you will need to make sure you have the flipped version as wide as before. The rotate button in the Picture toolbar won't flip your image, and will only rotate 90 degrees at a whack. To have more control, you need to use the little green circle (at the top of your selected image) to rotate with your mouse when the image is selected, or the side handles to flip it.
Got questions?
Search mrswizard.com and compuquicktips.com
with Google!
|